Tuesday, April 29, 2014

A Newer Wilderness: Another Analog Spring

Hiking in the Maine Woods

It's time once again for my annual reverse migration to the woods of New Hampshire, where I teach at the University of Michigan's New England Literature Program, affectionately known as NELP (see past posts from/about it here). There 40 students and 13 staff members (along with a couple of dogs) take to the northern wilds to read Thoreau and Emerson, Dickinson and Frost, and modern New England authors, write in journals, and climb mountains in an immersive experimental study of literature and creative writing and New England culture, history, and regionalism. 

As part of this process, we also relinquish our cell phones, computers, recorded music, internet and as a new experiment this year, digital cameras, so as to be more present in our work and the creative community at camp. 

Rangeley, Maine from the Height of Land
Emily Hilliard playing banjo at Hobo Half-Hour

Last year's analog blogging (anablogging?) during this time went so well, thanks largely to my friends Morgan and Elizabeth, that I'm going to do it again, this year hopefully with more frequency. For the next two months, I'll compose Nothing in the House posts long-hand or typed on a typewriter, taking film photos (hopefully developed at camp, as we have a darkroom!), and send them to Morgan who will scan and post them on the blog. I may also solicit contributions from a few guest bloggers. 

Homemade Apple Cider Donut Tower
Tinctures and Nathaniel Hawthorne quotes

This year marks my 5th year as a teacher at NELP, and 6th including my time as a student, which means that when June 22nd rolls around, I'll have spent a year of my life in these woods. Along with analog postings involving baking of bread and pies in our industrial bakery, I'm excited about leading a Transcendental Diner Society with my friend Becky (more on that soon), working on my tree and spring ephemeral identification, writing some songs with my friend Chris, re-learning how to develop film, and forever working on finding that important pedagogical balance between nurture and rigor--they really go hand in hand, yes? 

Sunset at Camp Kabeyun on Lake Winnepesaukee, NELP

Thanks for indulging this analog-to-digital experiment once again. Wishing you a lovely, inspiring spring. For now, a favorite Emily Dickinson poem, and until soon in pen and ink.

1233
Had I not seen the Sun
I could have borne the shade
But Light a newer Wilderness
My Wilderness has made --

Friday, April 25, 2014

Lemon-Ricotta Crostata and a Spring Sunday Cookout

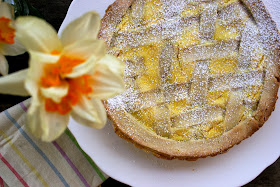
Lemon-Ricotta Crostata  and Daffodils
 I'm literally about to run out the door, jump in the car, and head north for two months (more on that soon), so I'm going to keep this short. But before I take to the north woods to watch spring come in for a second time, I wanted to share a little snippet from a highlight of the season down here in DC.

Last Sunday I hosted an house show with the Blackburg, VA old-time band The Black Twig Pickers and Vermont singer-songwriter Sam Moss, and decided to lump my birthday celebration and last DC hurrah (for a while) into the occasion. I invited pals over for a pre-show backyard cookout, which was just the thing I needed in the midst of the headed-out-of-town rush. There were flowers and fried pickles, copious amounts of meat, grilled asparagus, deviled eggs and other delights with some of my favorite people in the city.

Spring Sunday Cookout, The Dollhouse
Emily in striped dress in Dollhouse backyard

I made Domenica Marchetti's Lemon-Ricotta Crostata, a traditional Italian Easter dessert. The crust is a little finicky, but it's worth the trouble--perfectly buttery and light. I think you could also replace the ricotta with goat cheese, like in this recipe, if you're so inclined. I was hoping to make a rhubarb sauce to top it all off, but could find none at either the farmers' market or the grocery, so I opted for (California) strawberries instead. I must say, they were the perfect thing to pair with this rich, lemony confection, but I do want to try that rhubarb sauce sometime.

Lemon-Ricotta Crostata

Lemon-Ricotta Crostata
From Domenica Marchetti

Ingredients
For the dough:
3 cups all-purpose flour
1 cup confectioner's sugar
1/4 tsp. fine sea salt
Finely grated zest of 1 lemon
1 cup (2 sticks) unsalted butter, cold and cut into 1/2-inch cubes
1 large whole egg
2 egg yolks

For the filling:
8 oz. fresh sheep's milk ricotta or well-drained cow's milk ricotta
8 oz. mascarpone
1 large whole egg
2 egg yolks
1/2 cup confectioner's sugar, plus more for dusting
1/2 tsp. vanilla extract
Finely grated zest of 1 lemon, plus 2 Tablespoons freshly squeezed lemon juice

Directions
For the dough:
1. Put the flour, sugar, salt, and lemon zest in the bowl of a food processor fitted with the metal blade. Pulse to combine. Distribute the butter around the bowl and pulse until the mixture is crumbly. Add the whole egg and egg yolks and process just until the mixture begins to come together in the bowl.

2. Turn the bowl out on a lightly floured surface and briefly knead it together. Without overworking it, shape the dough into a disc, patting rather than kneading. Wrap tightly in plastic wrap and chill in the fridge for at least 1 hour, or until well-chilled.

3. Remove the dough from the fridge and cut into 2 portions, one slightly larger than the other. Re-wrap the smaller portion and return to the fridge. On a lightly floured surface, roll out the large portion into an 11-inch circle, about 1/8-inch thick. Transfer to a greased and floured 9-inch tart pan with a removable bottom (I had to do some piecing together for this, as the dough is a little dry). Press the dough into the bottom and up the sides of the pan. Roll the rolling pin over the top of the pan to remove any excess dough. Place in the fridge to chill for 30 minutes. Meanwhile, prepare the filling.

For the filling and assembly:
1. Preheat oven to 350 degrees F. In a large bowl, combine the ricotta, mascarpone, whole egg and yolks, sugar, vanilla, lemon juice, and zest. Using a stand mixer or handheld beater, beat the ingredients on high for about 1 minute or until thoroughly combined and fluffy.

2. Remove the tart shell from the fridge and scrape filling into it, smoothing with a silicone spatula. Roll out the reserved dough on a lightly floured surface into a 10-inch round, about 1/8-inch thick. Cut into 3/4-inch wide strips with a fluted pastry wheel. Carefully place the strips over the fitted tart shell in a lattice pattern, gently pressing the ends into the sides of the tart. Use any remaining strips to form around the tart's perimeter.

3. Bake the crostata for 35-45 minutes or until the crust is golden and the filling is puffed and just set. Remove from the oven and place on a wire rack to cool for 20 minutes. Remove the tart ring and let cool completely. Serve at room temperature or slightly chilled and dust with confectioner's sugar before serving. Will keep in the fridge 2-3 days.

Sam Moss' Guitar at the Dollhouse

As evening fell and it started to get chilly, we moved inside for a lovely candlelit living room show with  Sam and The Twigs. My friend Morgan took some beautiful photos of the evening (all the non-tart photos are hers)-- you can see them all on her blog. Our friend Dave also made a recording of Sam's set, which you can listen to here.

The Black Twig Pickers at the Dollhouse, Washington, D.C.

Related recipes:
Cranberry Goat Cheese Tart with Almond Shortbread Crust
Rustic Cheese Pie
Wild Blackberry Lemon Goat Cheese Tart

Non-tart photos by Morgan Hungerford West

Thursday, April 10, 2014

Samoa Pie & Elizabeth Graeber at Wild Hand Workspace

Elizabeth Graeber at Wild Hand Workspace

Elizabeth, Morgan, and I had so much fun with last month's collaboration/excuse to hang out (which is really the best kind of collaboration) that we decided to turn it into a monthly affair. April's edition was kind of a no-brainer, as Elizabeth was already planning to have an art show at Morgan and her friend Victoria's studio, Wild Hand Workspace. I jumped on board by contributing baked goods for the opening last week.

Inspired by Miss Moss' fashion and food pairings, I wanted to make some food items that were inspired by Elizabeth's art, whether in shape, color, form, or topic. Her tiger painting and another tiger pillow (which served as the show's poster) reminded me of the Samoa Pie I'd seen in Allison Kave's inspirational new pie cookbook First Prize Pies. A wildly creative collection of show-stopping recipes with at least one pie for every week of the year, I recommend picking up a copy and baking your way through the book. That's what I plan to do at least.

The Samoa Pie is, as you might imagine, a take on the Samoa Girl Scout Cookie or as they're called where I'm from Caramel deLites (for more on the regional name variations, read this incredible piece of investigative journalism on the subject). Like the cookie, it has a shortbread base, coated with caramel, coconut and chocolate. I love that this recipe uses coconut cream in the caramel, which adds an extra coco-nuty kick. Do make sure to refrigerate the coconut milk before you plan to make the pie--I forgot to plan ahead and had to delay my caramel making a bit.

Samoa Pie at Wild Hand Workspace

Samoa Pie
Adapted only slightly from First Prize Pies by Allison Kave

Ingredients
For the crust:
1 1/2 cups shortbread cookie crumbs (15-20 cookies)
2-4 Tablespoons unsalted butter, melted

For the filling:
2 cups sugar
1/4 cup corn syrup
1/2 cup (1 stick) unsalted butter, cut into pieces
1 can (14-oz) full fat coconut milk, refrigerated
1 teaspoon vanilla extract
1/4 teaspoon salt
1 cup toasted shredded coconut

For the topping:
1/4 cup toasted shredded coconut
4 oz. semi-sweet chocolate, chopped or chips
1/4 cup heavy cream

Directions
For the crust:
1. Pulse the cookies in a food processor until finely ground. Pour in the butter gradually and pulse between pours until the mixture it the texture of wet sand. Firmly press the crumbs into a 9-inch pie pan. Chill the crust in the fridge or freezer while preheating the oven to 350 degrees F. Bake for about 10 minutes until golden, then remove from the oven and let cool completely.

For the filling:
1. In a heavy-bottomed medium-sized saucepan, stir together 1/2 cup water, the sugar, and corn syrup until the sugar is mostly dissolved. Cook over medium-high heat, moving the pan around occasionally, until the caramel has turned a dark amber and reached 360 degrees F on a candy thermometer (for me this took about 15 minutes). Keep a close eye at this stage and the caramel can burn very quickly.

2. Remove the saucepan from the heat and immediately start to whisk the butter into the caramel. Be very careful here as the caramel will bubble violently and release a lot of hot steam. Open the chilled can of coconut milk and spoon off the thick, white coconut cream from the top (save the remaining water for smoothies!). Whisk the coconut cream into the caramel until it is fully dissolved, then add the vanilla and salt. Stir in the toasted coconut flakes and pour the filling into the pre-baked pie shell.

3. Refrigerate the pie, uncovered, for at least 1 hour, until the surface of the pie is set. Sprinkle the toasted coconut flakes over the surface of the pie. 

For the topping:
1. Place the chocolate in a heat-proof bowl and set aside. Heat the cream until scalded and then pour it over the chocolate. Let it sit for a minute and then whisk until glossy and no chocolate chunks remain. Using a fork or whisk (I found a whisk to work best), drizzle the ganache over the surface of the pie in a crosshatch pattern, then sprinkle the toasted coconut flakes on top. Return the pie, uncovered, to the fridge to fully set for at least 4 hours but preferably overnight. Serve the pie just chilled or at room temperature (it can begin to melt if it gets too warm). 

Black and White Cookies + Elizabeth Graeber Zebra Illustration at Wild Hand Workspace

Along with the Samoa Pie, I also made Coconut Caramel & Chocolate Tarts (with leftover pie filling), Grapefruit Meringue Tarts, and Yossy Arefi's Mini Black and White Cookies, which you can find the recipe for on Food52. I didn't plan it this way, but Morgan noticed that they paired perfectly with Elizabeth's zebra painting, a companion piece to the tiger. Maybe someday we'll create a whole baked goods & painting safari experience!

Elizabeth Graeber books at Wild Hand Workspace

I'm forever enamoured with Elizabeth's work but it was so stunning to see her paintings and zines and pins and totes displayed across an entire wall of the light-filled Wild Hand Workspace. Thanks to Elizabeth for all the fun and fanciful art and to Morgan and Victoria for hosting such a lovely spring evening of art and friends and snacks and (somewhat dangerously) strong homebrewed saison via Grizzly Beer. Make sure to check out Panda Head Blog & Elizabeth's tumblr for more on the show-- and also BYT who featured it on their site with beautiful photos by Rachel Cumberbatch.

Elizabeth Graeber magnets at Wild Hand Workspace

Related recipes:
Dark Chocolate & Vanilla-Bourbon Salted Caramel Pie
Floriole's Milk Chocolate & Salted Caramel Hazelnut Tart
Gluten-Free Chocolate Coconut Pie

Photos by Morgan Hungerford West

Wednesday, April 09, 2014

Satsuma Orange Galette with a Cream Cheese Crust & Inspiration

Satsuma Orange Galette with a Cream Cheese Crust

I've been thinking lately about the function of a recipe-- how it is inherently a teaching text. That seems obvious, but I think it's something I often forget. How these thoughts translate to my own purposes is:
1) In how I interact with a recipe and consider the type of recipe I like to follow and 2) In how I can best write recipes in a way that not only teaches the reader how to make the thing that the recipe is in fact describing, but that also allows the reader how to have their own agency. I don't want my recipes to be so proscriptive that a reader doesn't feel like they can stray from it, improvise, or use their own variation. Because ideally, they will make it their own. To take that one step further, I've been considering how a recipe--or at least one in the form we think of it--could become unnecessary--where a text or combination of text and image might not be proscriptive at all but rather inspirational. It's like the difference between a traditional classical music score and something by John Cage or Pauline Oliveros or Christian Wolff where there is a range of variability allowed for, welcomed even, in each performance of the piece.

I'm not entirely sure what that all means for my recipe writing and for this blog, but it's something I'd like to experiment with more here and elsewhere. It feels exciting--a way to bring more experimentation and creativity to my own baking and the baking of others. Now I'm in a sense going to forgo all of what I just said and give you a pretty standard recipe, but with the side note that hopes to allow for some inventiveness and imagination.

Satsuma Oranges in wooden bowl

Galettes are one of my favorite things to make because of all the possibilities they can inspire. They can be as simple as pastry, fresh fruit, and a sprinkling of sugar, or involve multiple ingredients and processes. This particular time I was called to the leaf-on satsuma oranges at the grocery store (I know I'm hitting the tail end of citrus season here, but spring was late so I'm using that as my excuse). But I've made galettes in all sorts of varieties--sweet and savory. For savory dishes they are a great way to combine multiple ingredients but for dessert galettes, I usually like to stick with one type of very fresh fruit. It's a great way to showcase what's in season and let the fruit itself shine. You can also try different crusts--I've used my standard pie crust recipes but also rye crusts, buckwheat crusts, cream cheese crusts (like I use here) and more.

Here are a few galettes I've made in the past, along with a new recipe for a Satsuma Orange Galette with a Cream Cheese Crust (which is a variation on this Blood Orange Galette I made long ago). Hopefully they'll provide a little inspiration for your own kitchen improvisation, or as my friend Mandy calls it "free jazz baking."

Savory Galettes
Gordy's Cherry Pepper Spread Galette
Ham, Gruyere & Caramelized Onion Galette with Fried Egg
Heirloom Tomato-Ricotta Galette
Swiss Chard & Goat Cheese Galette
Tri-color Potato, Caramelized Onion, Goat Cheese & Rosemary Galette

Sweet Galettes
Apple Galette
Cranberry-Lime Galette
Plum & Orange Flower Custard Galette
Simple Rhubarb Tart
Strawberry Rhubarb and Wine-Soaked Fig Rustic Tart

Satsuma Orange Galette with a Cream Cheese Crust

Satsuma Orange Galette with a Cream Cheese Crust 

Ingredients 
1 cup flour, plus more for dusting 

1/4 cup plus 2 Tblsp. raw Turbinado sugar 
1/4 tsp. baking powder
 
1/4 tsp. salt
 
5 Tblsp. salted butter, cut into 1/2-inch pieces and chilled
 
4 Tblsp. cream cheese
 
3 Tblsp. ice water

6-8 oranges
1 large egg yolk mixed with 2 Tblsp. of water
 

Directions

1. Whisk 1 cup of flour with 2 Tblsp. sugar, baking powder, and salt. Add the 4 Tblsp. of cold butter in sliced pieces and cream cheese and cut into flour mixture with a knife and fork or pastry cutter. Sprinkle the dough with the ice water and combine until pastry can be formed into a disk. Wrap pastry in plastic and chill for 30 minutes. 

2. On a floured work surface, roll out pastry to an 11-in. round, about 1/4 inch thick. Transfer the pastry to a parchment paper–lined flat cookie sheet and refrigerate for 15 minutes.

3. Meanwhile, peel the oranges, removing all of the bitter white pith with a knife. Thinly slice 2 of the oranges crosswise and remove the pits. Transfer the orange slices to a plate. Cut in between the membranes of the remaining oranges, along section lines. You will need 1 cup of sections.

4. Arrange the orange sections on the pastry, leaving a 2-inch border all around. Sprinkle 2 Tblsp. of sugar over the oranges. Thinly slice the remaining 1 Tblsp. of butter over the oranges. Fold up the pastry over the oranges, leaving most of the oranges uncovered. Brush the pastry with the egg wash and sprinkle lightly with 1 Tblsp. of the sugar. Arrange the orange slices on top, leaving a 1-in. border of pastry all around. Sprinkle the remaining 1 Tblsp. of sugar on top. Freeze the tart until solid, at least 4 hours or preferably overnight.

5. Preheat the oven to 375° and position a rack in the center. Place a baking sheet on the rack below to catch any drips. Bake the tart directly from the freezer for 1 hour and 15 minutes, until the fruit is bubbling and the pastry is deeply browned. Let the tart cool completely. Serve with salted butter caramel sauce, if so desired. Recipe here.

Satsuma Orange Galette with a Cream Cheese Crust, Side View